Blog Archives
One Week with Meta Raybans: Audio and Camera Insights

Original Purchase Date: October 3, 2024 (used for one week as of this writing)
One week of use is not enough to determine if these glasses live up to the hype, but I have racked up a solid list of what I like about them, and where they can also be frustrating. The glasses are great headphones, first and foremost. Wearing headphones that I don’t have to think about (like putting in airpods) means I listen to more music, more podcasts, and even more audiobooks. I find myself listening to Instagram Reels with the sound on now, where before I just watched in silence.
The camera is also proving to live up to my expectations. Taking pics and videos without touching my phone is a BIG DEAL. Keeping me in the moment, while still capturing a snapshot in time. I’ve also experimented with 1st person video for my cocktail club, the Runaway Anchor, and that works nicely. On the “half empty” side of things, the transition lens is not as dark as I had hoped, leading me to still switch to old fashioned shades when it’s really bright, and the AI assistant has been spotty (though I haven’t used it that much…yet). At the moment I am very happy with my purchase, but only time will tell if these truly become part of my day-to-day life, or if they end up just being another piece of tech I use from time to time. And if they only end up being headphones, I’m not sure that’s a total win.
I own several pairs of very nice headphones (including Airpod Max) and I can confidently say that these glasses are my new favorite headphones. If kept at 50% volume, people around you cannot hear what you are listening to, and when you crank up the volume full blast, you can enjoy music and podcasts while mowing the lawn (tested last weekend). The quality of the sound is certainly not on par with the big “over-ear headphones”, but that’s not the point with the Meta Raybans. The point here is all about access. How easy is it to just hop in and out of your audio content. I no longer have to put Airpods in and out all the time, or look for where I put my Airpod Max headphones. With the Meta Raybans, I am always wearing my headphones, while at the same time, I’m kind of never wearing my headphones. It’s trippy, and unlike much of the technology changes over the past 5 years, it’s kind of life altering. I interact with audio on a different level now. I sneak little snippets of music and podcasts all the time, where before I would have to dedicate time for listening to audio sources. I also listen to audio in Instagram Reels and News stories because accessing the audio is just a tap away, and I never did that before these glasses.
The audio is turned on and off with a single tap on the right side. Sorry all you left-handers out there, this is a right-handed device for now (sigh). Two taps will advance the track for music and three taps will go back a track. Touch and slide forward to increase volume. Touch and slide backwards to decrease the volume. That’s it. Whatever audio source you are using on your phone will be controlled by tapping. Switching between things like podcasts, audible and music is a little clunky at the moment. Spotify support is supposed to get better, and you can have a default service when you ask for music (mine is Apple Music). But you can’t ask for an audiobook on Audible to start right now. That’s also an update that is said to be coming in the near future.
There is also a touch and hold audio feature that will start a designated music source (amazon music, apple music, spotify or calm). I have that set for Spotify, as I have better playlists there (curated by my kiddo). It’s a bit random at the moment, and I use the feature for my “I don’t know what I want to listen to right now” moments. So that’s it for the headphones part.

The camera is what got me to pull the trigger on this purchase. The idea that I could grab pics when I’m doing something fun without the usual “phone fumble” was exciting to me. Think about it. If you see something cool and want a pic, you do this: take out phone, wake it up, open camera app, point camera at thing you want picture of, push the capture button, turn off phone, put phone back in pocket. That’s a lot of steps. And the moment you capture is through a viewfinder (as in your phone screen)! With the Meta Raybans your eye is the camera, and the capture is just a single tap (or a voice command of “Hey Meta take a photo” if your hands are occupied or perhaps in the pic). I even managed to snap a pic of a book I was holding, by pushing shutter and quickly putting the object into the frame (see pic).
The camera is easy to use. Tap the button to take a picture (again, on the right side only!!) Hold the button to take a video (default is 1 minute, but can be increased to 3 minutes in the mobile app). I discovered quickly that if you are wearing a baseball cap the camera will see it, and you get a notification that the “camera is blocked”, but only after you are done shooting the video. So I ended up turning my hat backwards when I use the camera, which isn’t a great look, but it is functional. I don’t do a lot of “out in the world” videos, but I’ve shot a few to show different light impacts on filming (I’ll share those videos in the future, when I deep dive into the cameras). For now, I’m much more interested in the “point and shoot camera” but again, the hat brim will get in the way…
The quality of the video and images is great. Not as good as most current mobile phones, but still great for their intended purpose (quick snaps of what you’re doing, without the need to grab your phone). The audio capture is also great. I’ve made a couple cocktail videos that worked nicely, and I did a recording while singing and playing the piano that turned out nicely too (I will not be sharing that video though!) Time will tell how much I continue to use the camera. It’s worth noting that you can set up the mobile app so when you import images and video from the glasses they will copy into your phone’s photo library too. And if you delete the images in the Meta Mobile app, it will ask if you’d like the library copy deleted too. That is very handy and keeps down the image clutter!


Alright, that’s enough good stuff. What about the bad stuff, right?!? Much like the new iPhones, the AI elements of the Meta Raybans are pretty basic, but promise updates “soon”. The command is “Hey Meta” and then you can ask basic questions. Weather and Timers work great (just don’t use the British voice assistant or you’ll get Celcius for weather). You can “google things” with some success. I was able to ask for the hours at a local restaurant before heading out the door (some day maybe I can get on the wait list with a quick voice command…) But, all in all, the AI is more of a gimmick, than a feature I use often. But I truly haven’t kicked the tires to hard yet, and plan to do that in the weeks ahead. Stay tuned.
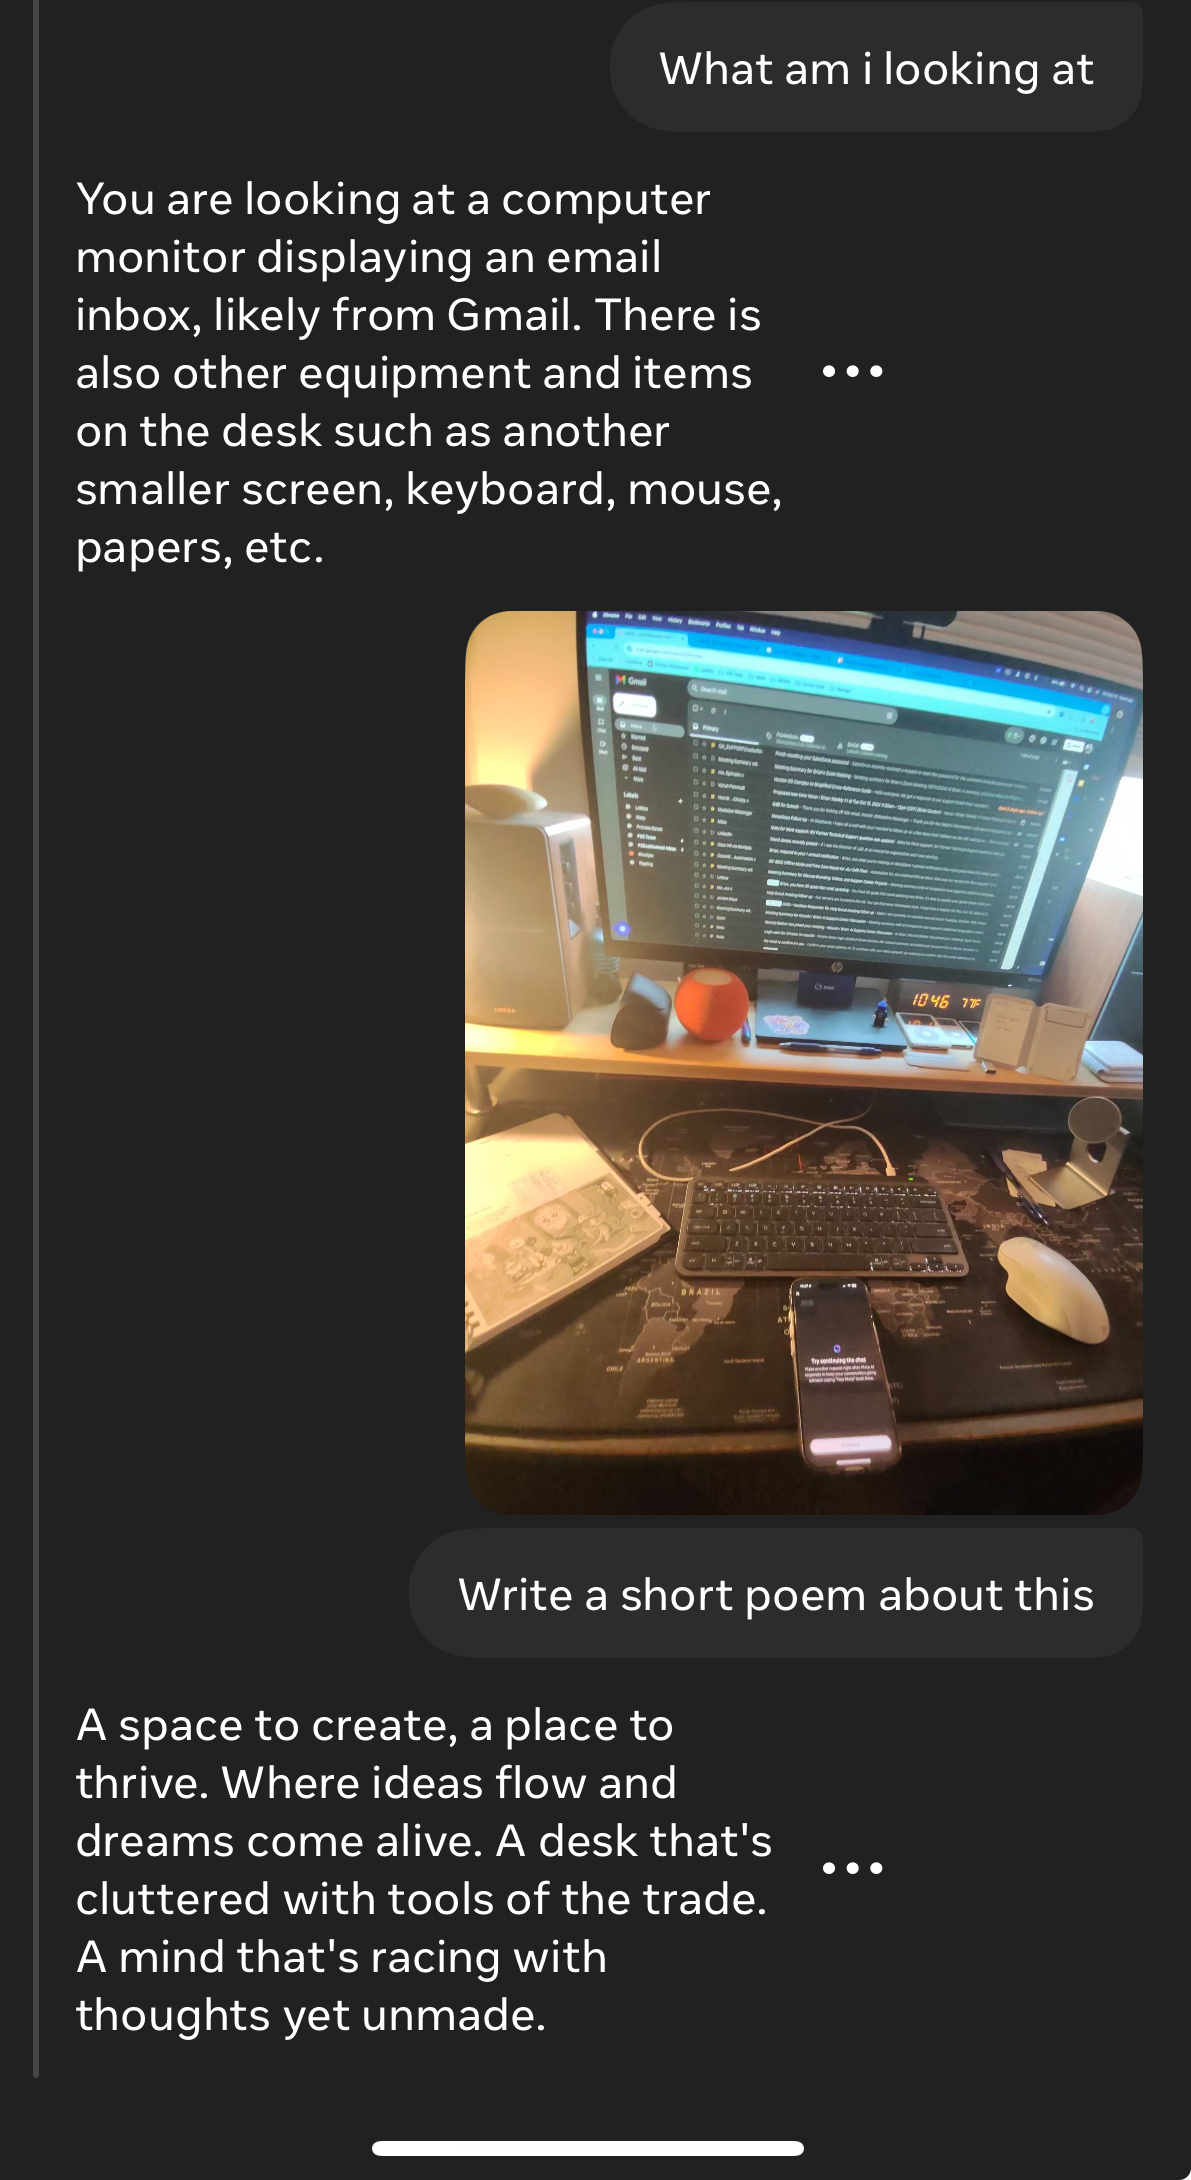
The one AI element that has been most interesting to me is “tell me what I see”. When you ask this you will get a detailed description of what is in front of you. Down to pretty detailed elements. Then you can ask it to write a poem about what you see. Here the pic and poem the glasses came up with when I looked at my home desk. When the features update to include actionable questions, that’s when this tool goes from gimmick to useful. But we are not there quite yet. I am hopeful.
I’m just a little over a week with these Meta Raybans smart glasses, and so far I’m really impressed. A friend of mine, who is a fellow Meta Raybans owner, responded this way when I said I was really enjoying the glasses so far. “I know you’d love them… they are so in line with your tech values”. That is really true. I do not like my smartphone. I do not like staring at screens. I think it’s better when we put our tech aside and just be in the world. But realistically, we are stuck the mobile internet on our person at all times. So any tech that keeps my hands empty and data easily accessible is definitely “in line with my tech values”. And so far, these glasses are doing it. Now I just have to see if my usage is sustainable, and not just the excitement of something new. I’ll be back with more posts in the future, as I examine daily use and dig into specific features in much more depth. Till Next Time…

The Tech of NYC – The Apps
 The holiday season caught me up in a wave, and time went along with it. So a month after I spent a packed weekend in New York City, I am finally getting around to a quick review of the apps that I used to have a successful weekend in the Big Apple. I’ll say right away that my app plan didn’t go as expected, but everything worked out perfectly in the end. Some old apps showed new power, and some new apps proved duds. So first off here are the apps that I pre-loaded for the trip.
The Apps that I planned to use
I love app folders. I have hundreds, yes HUNDREDS, of apps on my iPhone, and folders keep me from going absolutely bonkers. Though if you find yourself searching for an app, here’s a TECH TIP. Just swipe down from the CENTER of the screen, and you’ll find a search bar at the top. Type the app name and you’re on your way! Ok, back to the apps.
 I created a “New York City” folder to hold all of the “amazing” apps I planned to use. Here’s the breakdown.
Top of the Rock
Rockefeller Center
New York eTips
NYC Tourist
NYC Essential Guide
NYC Subway
Central Park eTips
911 Memorial
 My choices of applications were based in what I “planned” to do. I wanted to go to the top of Rockefeller Center (mainly because it was cheaper than the Empire State Building and closer to my hotel). So I got a couple Rockefeller apps. I planned to ride the subway at least a couple of stops, so there’s the NYC Subway app. Central Park was on my Agenda and “eTips” had a nice app highlighting a few bits. Finally, every tourist needs some tourism apps that are all encompassing. I grabbed 3 of them (New York eTips, NYC Tourist, and NYC Essential Guide). I ended up missing the Top of the Rock so those apps went unused. But I missed that trip because our team went down to the financial district to visit the 9/11 Memorial, and that’s where I ended up with my last app on the list, the 911 Memorial App, which proved to be one of the most interesting and powerful apps in the bundle. So how did I use these apps? Spoiler, my primary app wasn’t even on the original list.
The Apps that didn’t make the Cut
I browsed my tourism apps on the plane ride to JFK. I quickly discovered that the eTips guides for NYC and Central Park had only limited content before you had to pony up some dough. For a three day trip, I planned on spending my money on souvenirs not apps. So there went both eTips guides. NYC Tourist offers a nice map showing lots of locations, but it is incredibly busy. I did keep the app the first day, and used it a couple times (found the closed Carnegie Deli with it). But ultimately it went on the scrap pile too. That left me with just a handful of apps that really made the weekend work.
The Apps I Actually Used
My primary tourism app was “NYC Essential Guide”. This app does suffer from the “only a few things are free” issue that plagued all of my tourism apps, but one feature made this app worth it. It’s called “Top 25” which highlights 25 points of interest, including brief overviews, maps, reviews, and contact information. I can see a lot of potential in the “premium features” but I wasn’t spending nearly enough time to make that worth it. Maybe next time! The trip to the 911 Memorial was on the subway’s Red Line. I used my “NYC Subway” app to keep track of the stops and to know when to dash out the doors. TIP: if standing, lean against the train’s forward motion, or you’ll end up on your butt; it’s  fast!” The final app I ended up with (aside from my final surprise) was the 911 Memorial app. I highly recommend a visit to this memorial. And plan to take the audio tour and keep your camera in your pocket. This is a somber experience, a sobering experience, and one not to be missed. Everyone I went with got the audio tour kit (with a tape player of sorts and headphones). I opted for the earbuds only, and added the audio tour via the free 911 app. The lady at the audio tour counter didn’t even charge me the $5 for the earbuds. We went into the memorial as a group of 10, but we came out slowly one by one, as we each were immersed in the experience of the memorial. If you can, go.
The old app worth its weight in gold!
 Two words. Google Maps. We all know this app. We all have used it from time to time. If it’s to find a local restaurant, get turn-by-turn navigation, or simply check out cities around the globe down to street view; this is an app I always took for granted. But when I hit the pavement Sunday afternoon to begin my ambitious 10 mile hike around Midtown and Central Park, Google Maps was my guide. I spent some time before I left the hotel figuring out how many minutes it would take to get from location to location, to ensure I would make it back to catch my ride to the airport. I loaded my itinerary into my Evernote App, and I never touched the phone again (except to take pictures). My plan, built with Google Maps, went off without a hitch. I could totally see this being my go-to app when I’m in a new city (I get to test my theory in San Francisco in two days). An old favorite showing it still reigns as the king of maps!
The Whole Cup Summed Up
Apps are only as good as how seamless they work with your planned agenda. They are only good if they enhance your experience. If you are fighting the app, it’s not worth the time. I used some duds, and found some gems during my weekend in New York City. So the next time you head out on the road, be sure to find some apps, and build a folder to keep them straight. You’ll use some often, and quickly deleting others, and that’s okay. Just don’t forget, when in doubt, turn to Google Maps!
Happy Traveling


Review – Basis Peak Fitness Watch

I have reached the end of my two week testing of the Basis Peak Fitness Watch. If you haven’t caught up with my “first impressions” review, click here first for a breakdown of the features of this device.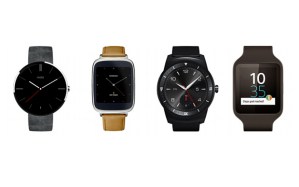
The Basis Peak has definitely lived up to its category as a fitness watch. It’s much more than a typical fitness band, which generally counts your steps, calories, and maybe flights of stairs. A few fitness bands are starting to show actual clocks and collect or display heart rate data. I fall in the camp that says for a fitness band to be considered a watch it needs to look like a watch. Maybe I’m old-school. But I’ve asked around and that seems to be the general consensus. If it looks like a watch, it’s a watch. And the Basis Peak certainly looks like a watch. But it’s not a smartwatch, not by a long shot.
It is the current expectation in the tech industry that even the most basic smartwatch must do several things, and do them consistently well.
- Show incoming calls and allow answer or decline from the watch (then you grab your phone to actually start talking if you selected “answer”)
- Show incoming emails and texts from multiple text/IM services
- Show Calendar appointments with alerts sent to the wrist
That’s it. Those three things are not optional any longer. The smartwatch that I usually wear is the original Pebble, and it is arguably one of the most basic smartwatches, but it does those three things consistently. It also has apps for timers, weather, Evernote, and games. You can even track your Domino’s pizza order with it! Being that the Basis Peak costs TWICE AS MUCH you would expect that it would have similar “smartwatch” features. And while the device makes an attempt, it simply isn’t there yet. I found the watch could consistently receive incoming calls and texts, but nothing else. And this was only when paired to an iPhone. It was all but impossible to pair the watch with an Android phone during my tests. I made it work eventually, but for casual users, who want a “pair and go” approach for their device, this is not an ideal choice.
So if the Peak is not a Smartwatch, you might be wondering what it does to justify its $200 price tag? Simply put, it tracks your health metrics, and a lot of them. Steps are caught like any pedometer (no mileage calculated though). The device has an excellent heart rate monitor, which I found very useful. It also has sensor to detect perspiration and skin temperature. I guess I could see some value in the sweat sensor, but I live in Minnesota, and my skin temps are going to swing wildly just by moving between buildings and vehicles, so I’m not sure why I should care about that. Data is only good if you can do something with it. And that brings me to the last feature of the Peak Fitness watch that I found useful.
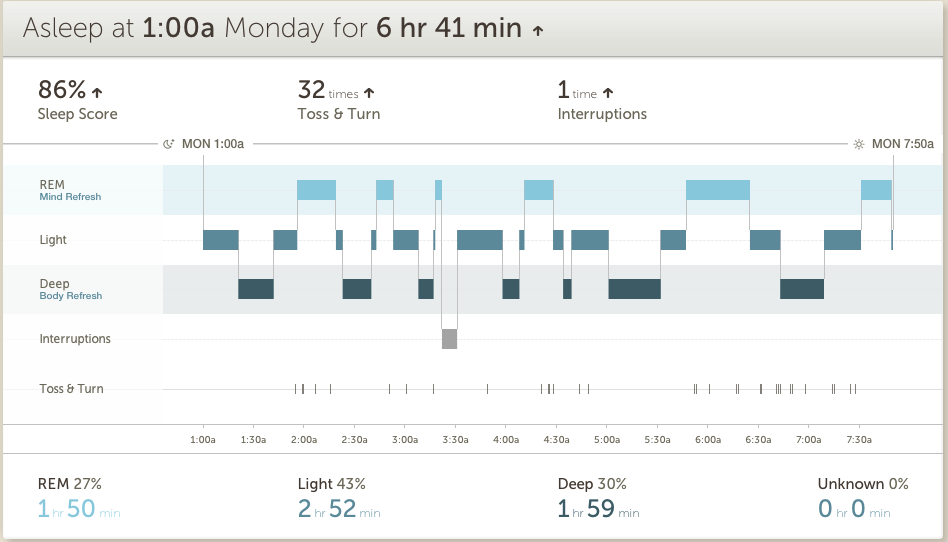 Most fitnessbands/smartwatches make some attempt to track sleep, but the Peak does this better than any other device I’ve used. Being able to look at my sleep metrics, which were broken down between Light, Deep, and REM sleep was helpful not only in determining if I was getting enough sleep, but whether I was getting the right amount of each type of sleep. I found myself trying to get to bed earlier to get more quality in my sleep, and that turns a gimmick into a tool.
 Aside from the features on the watch itself, Basis offers a website and smartphone app. I found the website more useful than the app in general, having more real estate to show the data over time in effective ways. The company offers various “goals” to shoot for, but since there is little interaction with the watch itself, other than telling you when you’ve “met your goal”, I found that more gimmicky than useful. In the end I found tracking over time less important than tracking right in the moment. I walked a few flights of stairs, entirely winded, and I could actually check my heart rate, in real-time, and that’s pretty useful, if you’re trying to improve your health through exercise.
The Cup Half Full
 The Peak went to market as a Fitness Watch. Its main feature was the Heart Rate Monitor, and that is the thing it does best. I tested the monitor against a doctor validated monitor and found it to be very accurate. Not exactly the same, but close enough to use it as a guide. I have used the heart rate monitor more than anything else with the Peak, and I know I will miss having that feature when I return to the Pebble this week.
The rest of the Fitness Watch metrics are nothing to get excited about, but they work. It tracks steps pretty accurately, if you’re one to shoot for those 10,000 daily steps. The fact that it is waterproof is a huge plus, and should really be a standard feature for this type of device. The battery life came through at roughly 4-5 days between charges, which is great. It also has a nice 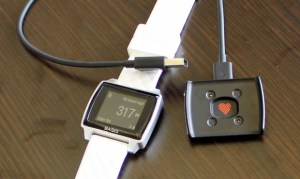 charger, using a magnet connection for easy charging, without any case to remove or small connection devices to lose.
The watch itself is very comfortable. The silicone wristband can pinch a little when you strap it on, but once in place I barely know it’s there. It needs to fit snugly to ensure accuracy with the HR Monitor, so comfort is very important. It’s not a stunning watch by any stretch, but it’s also not an eyesore. It works as a watch and as a Fitness Tracker.
The Cup Half Empty
As stated, it isn’t a Smartwatch. I found all of the functionality that was added to the device via a software update in early February to be inconsistent at best and at times virtually impossible. The watch connects to the smartphone via Bluetooth and after some initial problems with my iPhone 6 I got that syncing very smoothly. But only voice and text information came to the watch, despite ensuring the settings were turned on to have emails and calendar updates come too. My attempts to sync with an Android device (HTC One M8) were incredibly frustrating. Even after a software update came during my trial claiming to “resolve Bluetooth sync issues” I still could not get the device to pair. I’m in the business of finding devices that are so easy just about anyone can use them. The Basis Peak failed that test on all levels in terms of its “smartwatch features”.

In addition to those issues, the only other problem I have with the Peak is related to its price. For $200 it should be able to do more than it does. Things like showing the current temperature would be a start. You get the date when you tap the screen, but that’s it. There are no buttons on the device, which is actually kind of nice, but it took me a google search to figure out that you had to slide up and down along the right edge of the watch to turn on the backlight. The device is marketed as being “automated” and thus the premium price model, but it is simply too far behind with some basic features to justify the cost. I could deal with $149, but $200 is too much.
The Whole Cup Summed Up
 I sort of love and hate the Basis Peak Fitness Watch. Over the course of my two weeks of testing I found the device very useful at times, and very frustrating at others. The 24/7 Heart Rate monitoring and Sleep Tracker actually drove me to change some of my habits, including giving up caffeine, and working harder to be more active. I can’t over-stress how important that piece of the puzzle is when looking at fitness watches or fitness bands. They MUST drive change in your habits, or they are really just an over-price clock. And in that regard the Basis Peak was a great success. A greater success than 2 years of wearing a Fitbit Flex and Pebble smartwatch ever were. Is it worth $200 for those features? That’s really up to each consumer. But if you are in the market for a fitness watch that will help drive behavior, the Peak is actually a decent contender.
But if you are in the market for a smartwatch that also has a fitness element, this is not your watch. Not at all. Certainly Basis will get their act together at some point and software updates will improve the notifications element of the Peak (after all, these features have only been live for three weeks as of 2/17). So only early adopters who can put up with the frustrations of inconsistency need apply. I’m one of those people, and even I was pushed to the breaking point when trying to sync to Android.
The Basis Peak is a great Fitness Tracker and has a place among the current crop of devices trying to give us all health data on the go, to keep us better informed about how our choices impact our health. Yet these devices are only as good as the value you place in them though, so bear that in mind as you ponder your choices. The Basis Peak is not a great Smartwatch, so steer clear until they fix those features.
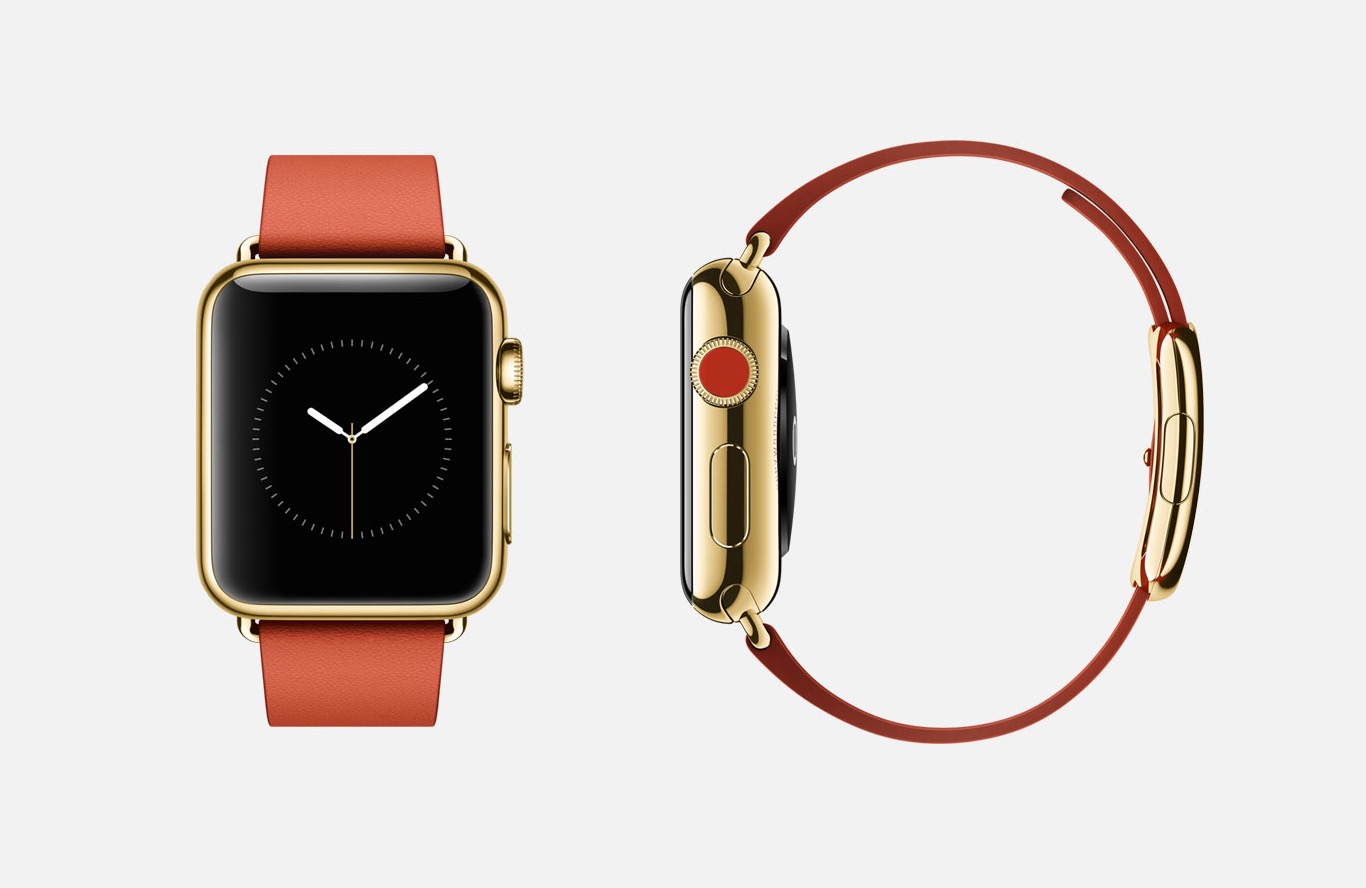
For me this one is still over-priced for what you get. And if I really want to go that route, I’ll just wait for the Apple Watch in April.
The Tech of Disney – MagicBands

I first heard about the Disney MagicBands from the CIO of Medtronic, who praised the technology in a town hall meeting, after a recent trip to Walt Disney World. He was drawn to the concept of a single device that could provide a variety of services in a portable form. I was excited to get my hands (or wrist rather) on my MagicBand for our Disney trip. Would it live up to the hype, or would this fledgling technology prove unequal to the task? I’m happy to say that the bands worked like a charm for several specific tasks. Here they are:
Magicband as a Room Key and Park Ticket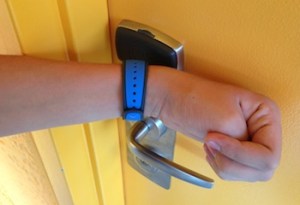
First off, the MagicBand replaces the room key for those staying at a Disney Resort, as we did. This isn’t a huge advancement in tech, as all it really does is take the chip found normally in the key card of a traditional hotel and places it in the band. Still it’s great to have one less thing to lose, because unlike a room key in your pocket/wallet/purse, it’s a lot harder to lose something strapped to your wrist (though I imagine some could still manage it!)

While the room key aspect of the MagicBand isn’t that revolutionary, the employment of the Band as a Park ticket is where things start to get interesting. Now Disney doesn’t care if you pass your band around your group when accessing your hotel rooms. Those rooms aren’t tied to daily admission. Park Tickets are costly, and everyone needs their own, so they added a second level of security at the gates to the parks themselves to ensure there isn’t any Band sharing. When you first scan your MagicBand at the gate, you are asked to place your index finger on a scanner. This effectively ties your MagicBand to your fingerprint, meaning no one else can enter a park with your MagicBand except you. That’s a great piece of security that isn’t that invasive to the entrance process. I had to redo my fingerprint at our second park, but I suspect that happened because I used a finger with a scar that gave the scanner some issues. Even with the second scan, it was not a time-consuming process.
If you are using a Park Hopper, which allows you to visit multiple parks in a single day, the MagicBand will work for all parks. You’ll have to scan that finger each time, but it’s usually a one-and-done kind of experience. We actually hit three parks in one day at one point, and the single park ticket on the wrist made the process very smooth. By the end of the week, entrance was a science. Smack your wrist to the Mickey till it turned green, then place finger on scanner until the bar went all blue, and you are on your way!
Magicband as a FastPass/PhotoPass
 Disney has been using the FastPass option for a while now. Essentially, a FastPass allows you to jump to the front (or near the front) of the line for the rides. Every ticket gets you three FastPasses for the day you are in the park. This isn’t a perk for people staying at Resorts, but having a MagicBand makes using them more convenient. Without a MagicBand, you are issued a paper ticket for the ride and time for each of your FastPasses. This means you’ve got three “tickets” to keep track of throughout the day! The SmartBand keeps your FastPasses for you, and you can double (and triple) check the times via the “My Disney Experience” app on your phone. A scan of the wrist at the FastPass entrance shows your name on a screen and you are on your way to the front. Insiders Tip: They do not check your fingerprint for the FastPass line, so you have the ability to swap bands. My daughter wasn’t interested in many of the roller coasters that we got fast passes for, so she often gave her band to a more adventurous cousin for a second spin.
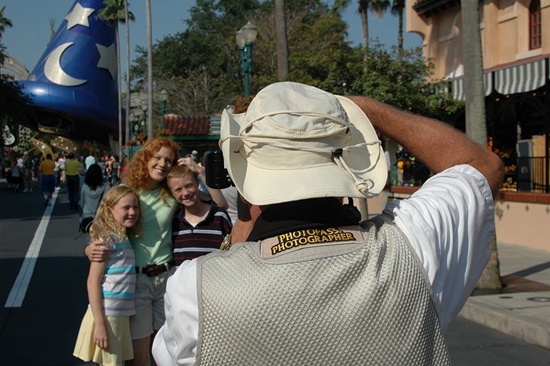 PhotoPass is another convenient service provided by Disney. The parks are filled with employed photographers, all set to take your family photos in front of iconic location like Cinderella’s Castle and the big golf ball at EPCOT Center. Again, the MagicBand can be used to quickly scan after the picture is taken, and the photo is uploaded automatically to your PhotoPass account. Another bonus is photo stations located after many of the rides (especially the coasters) where you can view your “during ride” pictures. You know the ones, with the scream faces! These stations have a place to scan your MagicBand as well, so those photos are instantly added too.
MagicBand as a Payment Source
The final aspect of the Disney MagicBand is the most complicated. Basically, the band can replace your credit card, so in theory you can leave your wallet behind (assuming you aren’t buying any adult beverages). Like the secondary security at the gates with fingerprint identification, whenever you use the card for purchase you are required to enter a four digit PIN number. This is not only a convenient feature, but a required one if you are traveling with children, and you don’t want them buying a bunch of stuff at the gift stores without your knowledge. Without the PIN, the payment source aspect of the MagicBand is worthless.
If you are staying at a Resort and have a Dining Plan, you can use your MagicBand for that as well. It requires the PIN number, so keep that handy.
The Whole Cup Summed Up
The Disney MagicBand is a truly revolutionary tool within the Parks and Resorts. Without the band each person would be walking around with a park ticket, three fast pass slips, a hotel room key, a photopass card, and credit card/cash in the wallet. With this simple accessory all of those items are combined into one thing. Of course I still got locked out of our hotel room one day when I went next door to talk schedules and forgot to put my Band on. Thankfully someone was there to let me in.
 But here’s what I’m most excited about after using the Disney MagicBand for a week, and that’s the potential wider expansion. We are already seeing the possibilities with the wave of Smartwatches that are sweeping through the tech festivals this year. Apple is set to launch their first smartwatch in the coming months. Android Wear is being adopted by more and more companies. People often ask me why we need another device strapped to our wrist? Won’t that just be another distraction? I agree with that possible outcome if the devices on our wrists are too interactive. If smartwatches are just another screen to stare at, that is a problem. Imagine how many people are going to walk into walls as a result! But if the bands on our wrist can be closer to the MagicBand than the Apple Watch, I think there is great potential for widespread adoption. With Apple Pay, more attention is being given to the industry of mobile payments. Google Wallet has been around for a long time, but few use it. I see a future where your wallet truly is right on your wrist. And this new technology will be even more secure than our antiquated bar scanner cards, using things like Apple’s fingerprint verification. The possibilities are limited only by our imaginations!
So if you are off to Disney and staying at a Resort, get ready for the Disney MagicBand, because you will get one. You can even jazz them up with stick on covers and accessories! Not staying at Resort, but still want in on the fun? You can purchase a band for $12.95 and activate all of the goodies already mentioned!
So strap that band on your wrist and wonder at the ease of use, the diversity of options, and the possibilities for such technology beyond the lands of Mickey Mouse, where the rest of the world is just waiting to join in.

The Tech of Disney** – Here Come the Reviews!
 We have just completed 8 days at Walt Disney World in Florida. We went with a specific plan, and months of preparation. But you know what they say about “best laid plans”. Managing 10 people (from an 8-year-old to the Grandparents), over the course of 8 days, where each day averaged 12 hours of actual Disney Park time was going to be a challenge. Kids had competing priorities, timing was a best guess much of the time. And so we had to make many adjustments to our daily schedules on the fly. And technology played a huge role in making those changes positive.
Over the next week of so, I will be posting a series of blogs about “The Tech of Disney”. Each post will focus on a different aspect of how technology enhanced our vacation (and the few times when technology failed us,  which was bound to happen at some point along the way). Disney has figured out many ways to make the vacation on their resorts a smooth process, but still we were newbies, figuring things out as we went along. I’m certain that our next visit to WDW will be even better because of the lessons we’ve learned throughout this week. And I know I will be looking for great apps again to make sure I am in control of my experience. Because while “going with flow” might sound good, planning and control are the best ways to make sure you get to everything you want to get to, and you don’t spend all our time in lines or on buses.
So check out the coming blogs if you have Disney in your future vacation plans, and hopefully I can help you out. Or if you’re a tech geek like me, make sure to read the blogs to hear a firsthand experience with the Tech of Disney!
**We also visited the Clearwater Marine Aquarium and Universal Studios/Islands of Adventure, so the posts will address the tech of those locations as well. Call it a bonus.


The Tech of Disney – Final Day

Our week at Walt Disney World is almost done. There has simply been too much going on to post during this week about the technology we’ve used in the parks, but I’ve been taking many notes.
Tech has played a huge role throughout our days. From last minute fast pass changes to wait times and park hours (even the need for the nearest first aid station at one point). I don’t know how people did these parks before the apps came along on the smartphones.
The tech of Disney has been more than just apps though (I got the chance to compare Disney to Universal Studios one day), and I’ll be sharing what I’ve learned in the coming week, once we’ve returned to the cold North!
